Posts

Showing posts from April, 2023

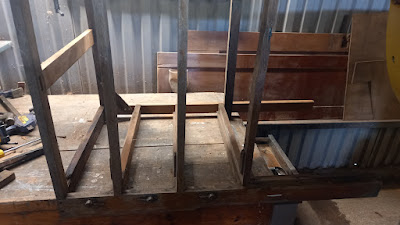
Varnishing the chart table to protect the woodwork

Image
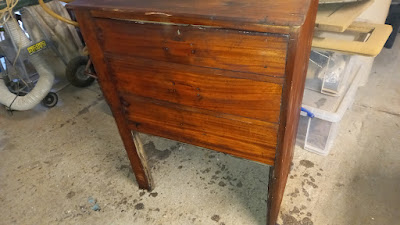
The first coat of thinned varnish to help protect the surface. We can now see what the colour of the wood was when Chance was originally build. The only thing we have not done is go overboard with the sanding. We have just got rid of the greyed colour back to the rich mahogany colour below the weathered surface. The colour of the panels are beautiful rich mahogany colour you do not see much these days.  The chart table top will be good once there are a lot more coats of varnish and there are charts being used on the chart table again. The lower locker door which is going to have a lot more coat of varnish, If this is a window into what the rest of the mahogany that was used on Chance when she was build, Chance is going to look beautiful when she is revarnished over the course of the restoration.   

Chart table restoration part 2

Image
Having sanded back the drawer fronts and the side runners of the Chart table drawers it looks a lot better and ready for a fresh coat of varnish and the lower part a coat of fresh white paint to brighten up the lower locker in the chart table unit A much improved chart table unit now that it has had a good sanding back to get rid of the old varnish The side panel now repaired and sanded back to a original colour ready for a fresh coat of varnish The chart table top which has been sanded back, although not all the age staining as been removed it is a lot better than it was before we started. Just have a small split being glued together before the whole of the top gets a final sanding back before it is varnished once more. A gluing repair being done to the lower locker door, This will need a lower rail making to attach the door to the rest of the chart table unit as it was broken when this unit was removed from the cockpit last year.   

The chart table framework having work done on it to stabilize the framework before the top and drawers are refitted.

Image
The chart table framework having some much needed repair work done to stabilize the framework so it can be refitted to the cockpit once the cockpit as been rebuild. The upright rail in the photo was just one of the parts needed to stabilize the framework . The other part needed was the corner brace to square up the framework back into its correct shape The framework now able to stand up by itself for the first time in a long time since it was removed out of the cockpit. Once the glue as cured the other work to stabilize the unit will be done. reinforcing the side and top panels from splitting and the the whole unit will be sanded down and re-varnished ready to be refitted into the cockpit once the cockpit floor is refitted. A good clean down and paint and varnish it will look as good as new and ready for another 70+ years.  

Gluing up the age related splits in two panels of the chart table

Image
The chart table top as dried out over the years and as split along the grain and in order to keep the chart table, it was decided to clean out the split and fill the split with epoxy glue with mahogany sawdust to make up any gaps in the split so it will look as much as possible the original mahogany.  The top as been clamped together in order to keep its shape and also clamped flat as much as possible to flatten it out so that when the glue as cured a reinforcement panel will be screwed and glued to the under side to keep the top from splitting again.    The same treatment was used on the side panel of the chart table, clamping the split together with sash clamps and the two halves leveled up so they are as flat as possible. Once again when the glue is cured there will be reinforcement panels fitted to the inside face of the side panel to stop the panel from splitting again. The gap was clamped together as much as possible to give the glue a good bond between the two halves to help sto

Starting to rebuild the chart table and drawer unit from the cockpit of Chance.

Image
The chart table and the drawer unit from Chance is in a bit of a rough condition and is in need of a bit of TLC and a few parts need replacing. Most of the unit is in good condition, conceding it was open to the elements for quiet a long while. It is a little bit out of shape, however, with a little bit of adjustment it will go back in shape and when the drawers are repaired they will go back into the unit. The inside will need a bit of paint and sealing as it as had very little in the way of protection in some while. The top is in need of TLC in the way of gluing the two part together before it is sanded down and re-varnishing  The same with the large end panel which needs bracing from behind and the gap clamping up and gluing together and sanding down and re-varnishing.  

Working on the Cabin and wheelhouse/ cockpit steps while not being able to work outside on Chance

This link show what Simon has been doing while the weather has wet and he as been unable to work outside on Chance.   https://youtu.be/1ayeJmN9_4U This Easter weekend Simon was not able to get on with all the jobs he had planned to do on Chance herself, So when the weather turned wet and windy he decided to go to his workshop and get on with a few of the jobs he could get on with while the weather was so he could not work outside on Chance. Simon continued to clean off the old varnish off the three sets of steps that Chance has for people to move around the inside of Chance and out on to her decks. In the video the short set of steps are the steps to gain access to the deck from the wheelhouse. this set of steps were to be placed in front of the starboard sliding door out on to the side deck. Although, over the years somebody had made an extra set of steps for the port side behind the steering position they were not original and will not be going back in as although there is a slidin

The carlin as been messed about with like the beam shelf, however, it as just had the ends messed about with not the whole of it.

Image
The joints are reasonably intact, however, there are parts of the carlin which are rotten in places, so it is as well to replace the whole of the carlin as part of the restoration of Chance. It was good to see  that at least one end of the deck beams had not been messed about with unlike the outboard end which had been butchered. So it will be possible to redo the deck beams in the same manner has they were when the deck beams were first fitted back 1947/8 when Chance was build.  One deck beam that did not survive as it had been either rotten or broken out when they repaired the beam shelf and relaid the deck planking   The aft end of the carlin is in the same condition as the forward end , the major problem in this area is going to be making new aft deck beams and making new lodging knees. However, this time we will make the parts out of laminated oak which will be a lot stronger than the original parts and be more rot resistance.     

The starboard beam shelf which is going to be replaced with a new oak beam shelf and not a softwood beam shelf.

Image
This is the forward end of the original beam shelf and is in a less than excellent condition as the window above the beam shelf as been missing for some time and fresh water has been aloud to stand on the beam shelf when there was a shelf nailed on to the top of the beam shelf.  This is the area of the beam shelf is where the new aft section of the beam shelf was butted together with a packing block and just screwed together with steel screws and or even bolted together to maintain the strength in the beam shelf. The original beam shelf bolted in place, however, as you look down the new section of the beam shelf no bolts to be seen. As before as you saw in early blogs the tie rods which should be in place to hold the decks together have been cut through and so the deck moves apart from the itself with nothing to keep it in position. Also, what can be seen is the large area of rot in the beam shelf where the fresh water was able to get through the deck planking and into the softwood bea

Exposing a can of worms and much more, as Simon exposes a catalog of poorly done repairs in the past that have come to home to roost now

Image
Simon having spent the day removing the teak planking on the starboard side deck as exposed a catalog of poorly done repairs of the past which have ended up with the starboard side being in the condition it is now. The lodging knees that are there to connect the beam shelf to the deck beams were in position but not bolted to the beam shelf, just connected to the deck beam so the boat just lost its shape because nothing was holding the two parts together once the beam shelf was replaced at sometime in the past. The beam shelf was made out of softwood and as rotted away in places and is just bolted to the hull frames and nothing else. The inboard end of the short beams still fixed correctly where as the outboard end was cut off with the inboard side of the new beam shelf and just fixed with a couple of screws which have rusted away over time and so the beams are floating in fresh air. One area where the short beam was missing completely  The aft lodging knee as the forward lodging knee n