Posts

Showing posts from April, 2022

Our Son Michael getting to grips with sanding down the varnished doors off Chance

Image
Our Son Michael making a start on the first of his doors off Chance, they have been varnished last week and have been left for a week for the varnish to harden off and so making the sanding down easier. Plenty of PPE being worn to keep him safe   He is really putting his back into the job and he said after doing a few, he was enjoying doing this job ashe could see the results of his work.  

My wife Tricia's new job now she has retired from being a Nurse for the past 38 years

Image
This is not her first time doing any type of rubbing down of varnish work, Tricia helped me with our other restoration project boat, our East Coast classic gaff cutter called Mai Star II These are her first rubbing down jobs on our latest project boat the James Silver Western Isles Chance, The doors that she is rubbing down are the ones out of the galley area in the boat and are the doors from the locker above the cooker The door below is going to need a bit of repair work to the split in the centre panel Tricia dusting down the doors as she goes along to make sure she has rubbed down the varnish over all the doors evenly  Here are a few of the panels that Tricia has already rubbed down  

Doors, Doors Doors!!!!

Image
First I had to dismantle the affected doors like this door and clean up the joints and then clean the joints with acetone and then use a modern glue to glue and fix the joint back together.  Then clamp the joint together  with sash clamps until the glue cures off and the clean off the excess glue and with a quick rubbing down with some sandpaper , then start to varnish the door like the rest of the doors that have already been started to be varnished. Some of the doors are having to undergo some more major work in that there are more than one part needing to be replaced, As in the case of this door in the photo below This door is just in need of a single part of the frame of the door. Like the other doors I am dismantling the doors and cleaning the doors and then gluing them back together with modern glue and then varnishing the doors as they are being rebuild  These are the doors from the galley unit which were the doors from the locker above the area where the cooker was originally f

The other side of the cabin and locker doors getting the same treatment as the other side

Image
Now the first side as been given five coats of thinned varnish it is now time to give the other side of the doors the same treatment  These doors are really soaking up the thinned varnish The colour is really coming through these doors they are going to really make a different when they are finished and the bulkheads are all scraped and sanded back to the same as the doors and the whole of the interior looks the same    Some parts are really taking a lot of varnish. like this centre panel in the main door into the main cabin from the cockpit  

So the varnishing starts with the first of the repaired and sanded doors getting their thinned coats of varnish

Image
So it begins, the long road of daily varnishing until these doors look like them should be  As it can be seen the wood is taking up a lot of thinned varnish as they have not seen a varnish brush in over 20 years  The colour is coming through  the coats of varnish, if when the rest of the bulkheads and cupboard and locker fronts look like these doors it will be a very lovely sight down below in the cabins and when the Wheelhouse and aft cabin are varnished again as they should it will be a beautiful sight  

Some of the doors are in need of renewed parts, while others just need taking apart and regluing the joints

Image
A couple of the smaller doors are in need of new parts to be made to replace broken or rotten parts. Others just need taking apart and modern glue used to fix the joints. This is the first of the small doors getting glued together after the joints were cleaned and modern glue put on the mortise and tenon joints before being sash clamped together for the glue to cure and then sanded down The first two doors on the work bench clamped and left for the glue to cure and then they will be given their light sanding and then got ready to go with the others to be varnished.  

Setting up my mortise cutter to make new parts for the door frames for Chance

Image
Having got this as a Christmas from my wife, It is now time to get it set up for making the new mortise and tenon joints for the doors which have got either rotten or broken parts in them. With a bit of trail and error and a lot of patience will get the handle on this piece of equipment and will soon be making the mortise part of the joints  This is one of the original mortise and tenon joint which this new piece of equipment will be making in due course  

Rebuilding the small galley cupboard doors, first taking them apart cleaning the tenons and gluing them together with modern glue.

Image
Using these clamps in the reverse way, which you can do with this type of clamp with a little pressure the joints come apart A little at a time the tenons come apart  Then off completely and now ready for a clean up of the tenons  These tenons had small wedges to tighten up the joints which are left in place so they can be used again when a small amount of glue is placed on the wedge before the tenons are re-fitted   

Chances' doors getting sorted, some getting a sand down and others getting repaired and others getting a complete rebuild

Image
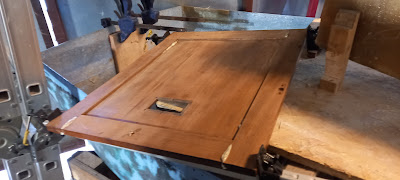
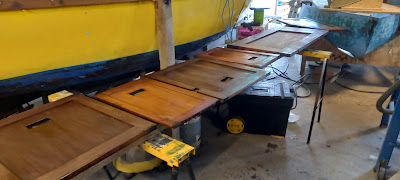
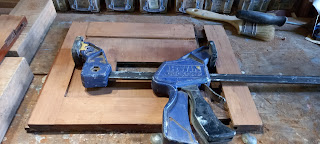
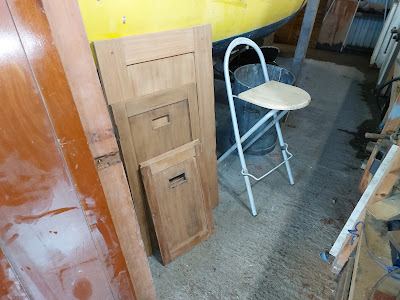
 The doors in the centre of this photo are the first of the small doors that have been repaired as necessary and then just been sanded down ready to get their first coat of thinned varnish  Some of the other small doors have not faired as well and will need some replacement parts made for them, it some cases more than one piece, others just need just one side of the door.  Other small doors just needed gluing back together as the old glue as given up and the small wedges in the tenons are not enough to hold them together any longer.  A small amount of cleaning up the joints and a small amount of modern glue and gentle cramping together and then a quick sanding down when the glue is cured and then they can be put with the other doors to be varnished  However, these pair of doors are not so good as they are either broken or rotten and in the case of these two doors they are both rotten and broken, so these two doors will have to be completely rebuild  This door is rotten in the centre of

Finally back on my feet again, although not completely back to square one

  Finally  back on my feet again, although not completely back to square one, they are a lot better and I can drive again. So back to work next week and get work done on the jobs that have been sidelined for the past 2 weeks. This means, although I can not go up ladders for a few weeks while I get the strengthen back in my ankle muscles. I can walk short distances and can do bench work while sitting on a chair to do some of the smaller tasks which need to be done on Chance's doors and other items which are in the workshop. Once job which will take some time to sort out will be to set up my dovetail jig to make the new drawer frames for the drawers that are beyond repair as they are rotten in places where they were left in position and got wet and enclosed then let nature do the rest. The drawers from Chance are all rotten in one place or other apart from the drawer fronts which appear to have been spared from getting rotten. So at least the mahogany fronts will not have to be repla